
475 lines
20 KiB
Markdown
475 lines
20 KiB
Markdown
# YamBMS - M5Stack AtomS3
|
||
|
||
[](https://www.gnu.org/licenses/gpl-3.0)
|
||
[](https://github.com/Sleeper85/esphome-yambms/releases/latest)
|
||

|
||

|
||

|
||
|
||
> [!IMPORTANT]
|
||
> **GPIO Limitation:** AtomS3 provides **very few GPIOs**. This solution works best for:
|
||
> - **Supervising multiple RS485 BMS**
|
||
> - Limited number of UART BMS (3 maximum)
|
||
> - Applications where compact size is priority
|
||
|
||
## Overview
|
||
|
||
The M5Stack **AtomS3** combined with the **Atomic CAN Base** provides a compact and powerful solution for YamBMS applications. This combination offers CAN bus communication with isolation, a built-in display, and expandability through additional M5Stack units.
|
||
|
||
**Key Features:**
|
||
- Compact design (24×24×13mm AtomS3 footprint)
|
||
- ESP32-S3 with 8MB Flash
|
||
- Built-in 0.85" IPS display (128×128 pixels)
|
||
- Isolated CAN bus communication (up to 1Mbps)
|
||
- 6-axis IMU (MPU6886)
|
||
- Expandable with M5Stack Units (RS485, CAN, etc.)
|
||
- Programmable button
|
||
- Multiple development platforms supported
|
||
|
||
## Board Variants & Components
|
||
|
||
### AtomS3 Controllers
|
||
|
||
Choose one AtomS3 controller to clip onto the Atomic CAN Base:
|
||
|
||
| [AtomS3 Lite](https://docs.m5stack.com/en/core/AtomS3%20Lite) | [AtomS3](https://docs.m5stack.com/en/core/AtomS3) | [AtomS3R (8MB PSRAM)](https://docs.m5stack.com/en/core/AtomS3R) |
|
||
|-----|-----|-----|
|
||
| <img src="../../images/MCU_AtomS3_Lite.png" width="300"> | <img src="../../images/MCU_AtomS3.png" width="300"> | <img src="../../images/MCU_AtomS3R.png" width="300"> |
|
||
|
||
| Model | Flash | PSRAM | Display | IMU | Best For |
|
||
|-------|-------|-------|---------|-----|----------|
|
||
| **[AtomS3 Lite](https://docs.m5stack.com/en/core/AtomS3%20Lite)** (C124) | 8MB | No | 0.85" IPS | MPU6886 | Budget projects |
|
||
| **[AtomS3](https://docs.m5stack.com/en/core/AtomS3)** (C123) | 8MB | No | 0.85" IPS | MPU6886 | Standard applications |
|
||
| **[AtomS3R](https://docs.m5stack.com/en/core/AtomS3R)** (C126) | 8MB | **8MB** | 0.85" IPS | MPU6886 | **Recommended** (extra RAM) |
|
||
|
||
**Recommendation:** Choose **AtomS3R (C126)** if using Bluetooth BLE for BMS communication, as the extra 8MB PSRAM helps prevent crashes when the BLE stack consumes significant RAM.
|
||
|
||
### Base & Communication Units
|
||
|
||
| [Atomic CAN Base](https://docs.m5stack.com/en/atom/Atomic%20CAN%20Base) | [CAN Unit](https://docs.m5stack.com/en/unit/can) | [RS485 Unit](https://docs.m5stack.com/en/unit/iso485) |
|
||
|-----|-----|-----|
|
||
| <img src="../../images/CAN_Transceiver_M5Stack_Atomic_CAN_Base.png" width="300"> | <img src="../../images/CAN_Transceiver_M5Stack_CAN_Unit.png" width="300"> | <img src="../../images/RS485_Transceiver_M5stack_SKU-U094_RS485_Isolated_Unit.png" width="300"> |
|
||
|
||
| Component | Type | Features | Use Case |
|
||
|-----------|------|----------|----------|
|
||
| **[Atomic CAN Base](https://docs.m5stack.com/en/atom/Atomic%20CAN%20Base)** (A103) | CAN Base | Isolated CAN, up to 1Mbps, 110 nodes | **Recommended** for inverter |
|
||
| **[CAN Unit](https://docs.m5stack.com/en/unit/can)** (U085) | HY2.0 Unit | Isolated CAN via Grove port | Alternative CAN solution |
|
||
| **[RS485-ISO Unit](https://docs.m5stack.com/en/unit/iso485)** (U094) | HY2.0 Unit | Isolated RS485, up to 500kbps, 256 nodes | For RS485 BMS or multi-node |
|
||
|
||
## Interfaces Support Capacity
|
||
|
||
Based on hardware limitations and testing, this board supports:
|
||
|
||
| Interface | Maximum | Notes |
|
||
|-----------|---------|-------|
|
||
| **CAN** | 1x bus | CAN bus to BMS or Inverter (**after adding a CAN base/unit**) |
|
||
| **RS485** | 1x bus | Best option for monitoring many BMS of the same brand (**after adding a RS485 base/unit**) |
|
||
| **UART** | 3× devices¹ | CAN be connected to the **HY2.0 interface** or **Atomic Base GPIOs header** (**shared with RS485**) |
|
||
| **Bluetooth (BLE)** | 3× devices¹ | BLE stack consumes significant RAM, may cause crashes/reboots |
|
||
|
||
¹ BMS / Balancer / Shunt
|
||
|
||
**Note:** These are theoretical limits. Not all combinations have been tested. For large installations with many BMS units, consider boards with more GPIOs like the LilyGo T-Connect or Waveshare ESP32-S3-RS485-CAN.
|
||
|
||
## AtomS3 Specifications
|
||
|
||
### Hardware Specifications
|
||
|
||
| Specification | Details |
|
||
|---------------|---------|
|
||
| **Microcontroller** | ESP32-S3FN8 |
|
||
| **Processor** | Xtensa 32-bit LX7 dual-core @ up to 240MHz |
|
||
| **Flash** | 8MB |
|
||
| **PSRAM** | None (AtomS3 Lite/AtomS3) / 8MB Octal SPI (AtomS3R) |
|
||
| **Display** | 0.85" IPS LCD, 128×128 resolution |
|
||
| **UART** | 1x HY2.0 interface (not isolated) |
|
||
| **IMU** | MPU6886 (6-axis gyro + accel, I2C 0x68) |
|
||
| **Button** | 1× Programmable button |
|
||
| **Infrared** | IR transmitter built-in |
|
||
| **USB** | USB Type-C (power + programming) |
|
||
| **DC-DC** | SY8089 (5V to 3.3V) |
|
||
| **Power Input** | 5V via USB Type-C |
|
||
| **Operating Temp** | 0°C ~ 40°C |
|
||
| **Dimensions** | 24.0 × 24.0 × 12.9mm |
|
||
| **Weight** | 6.9g |
|
||
|
||
### GPIO Pinout
|
||
|
||
**Available GPIOs (Bottom Pins):**
|
||
- **G5** / **G6** / **G7** / **G8** / **G38** / **G39**
|
||
- Power: **5V**, **3.3V**, **GND**
|
||
|
||
**HY2.0-4P Expansion Port:**
|
||
| Pin | Color | Function |
|
||
|-----|-------|----------|
|
||
| 1 | Black | GND |
|
||
| 2 | Red | 5V |
|
||
| 3 | Yellow | G2 |
|
||
| 4 | White | G1 |
|
||
|
||
**Internal Connections:**
|
||
|
||
| Peripheral | GPIO Pins | Notes |
|
||
|------------|-----------|-------|
|
||
| **LCD Display** | MOSI: G21, SCK: G17, CS: G15, RS: G33, RST: G34, BL: G16 | SPI interface |
|
||
| **MPU6886 (IMU)** | SDA: G38, SCL: G39 | I2C address 0x68 |
|
||
| **IR Transmitter** | Built-in | For infrared control |
|
||
|
||
## Atomic CAN Base Specifications
|
||
|
||
### Hardware Specifications
|
||
|
||
| Specification | Details |
|
||
|---------------|---------|
|
||
| **CAN Transceiver** | CA-IS3050G (isolated) |
|
||
| **Maximum Rate** | 1 Mbps |
|
||
| **Supported Nodes** | Up to 110 nodes |
|
||
| **Loop Delay** | 150ns (low) |
|
||
| **Common-mode Voltage** | -12V to +12V |
|
||
| **Isolation** | Built-in isolated DC-DC |
|
||
| **Protection** | Signal protection + electrical line protection |
|
||
| **External Port** | VH3.96-4P terminal block |
|
||
| **Operating Temp** | 0°C ~ 40°C |
|
||
| **Dimensions** | 24 × 48 × 18mm |
|
||
| **Weight** | 11.1g |
|
||
|
||
### Atomic CAN Base Pinout
|
||
|
||
The Atomic CAN Base connects to AtomS3 through the bottom pins:
|
||
|
||
| Pin | LEFT | RIGHT | Pin |
|
||
|-----|------|-------|-----|
|
||
| | | 1 | 3.3V |
|
||
| | 2 | 3 | UART_TX (CAN_TX) |
|
||
| | 4 | 5 | UART_RX (CAN_RX) |
|
||
| 5V | 6 | 7 | |
|
||
| GND | 8 | 9 | |
|
||
|
||
**CAN Terminal Block (VH3.96-4P):**
|
||
- **CAN H** (CAN High)
|
||
- **CAN L** (CAN Low)
|
||
- **GND** (Ground)
|
||
|
||
**Note:** The exact UART pins used depend on configuration. Check the schematic for GPIO assignment.
|
||
|
||
## RS485-ISO Unit Specifications
|
||
|
||
If you need RS485 communication (e.g., for RS485 BMS, multi-node), add the **RS485-ISO Unit (U094)**:
|
||
|
||
| Specification | Details |
|
||
|---------------|---------|
|
||
| **Isolation Chip** | CA-IS3082W |
|
||
| **Maximum Rate** | 500 kbps |
|
||
| **Supported Nodes** | Up to 256 nodes |
|
||
| **Isolation Voltage** | 1000V RMS |
|
||
| **Protection** | Fail-safe, Overcurrent, Thermal shutdown, ±15kV ESD |
|
||
| **Connection** | HY2.0-4P Grove cable to AtomS3 |
|
||
| **Terminal** | VH-3.96 4P (A, B, GND, +V) |
|
||
| **Dimensions** | 56.0 × 24.0 × 10.2mm |
|
||
| **Weight** | 9.1g |
|
||
|
||
**RS485-ISO Unit Pinout:**
|
||
|
||
| HY2.0-4P | Black | Red | Yellow | White |
|
||
|----------|-------|-----|--------|-------|
|
||
| PORT.C | GND | 5V | UART_RX | UART_TX |
|
||
|
||
**Termination Resistor:** The RS485-ISO Unit includes a **120Ω termination resistor** (provided separately) that can be connected when the unit is at an endpoint of the RS485 bus.
|
||
|
||
## Wiring Instructions
|
||
|
||
### Connecting CAN Bus (Atomic CAN Base)
|
||
|
||
The Atomic CAN Base provides **isolated CAN communication** via a VH3.96-4P terminal block.
|
||
|
||
|
||
| CAN bus | Terminal Block (VH3.96-4P) |
|
||
|---------|----------------------------|
|
||
| CAN H | H (CAN High) |
|
||
| CAN L | L (CAN Low) |
|
||
| GND | GND (optional) |
|
||
|
||
**Wiring Steps:**
|
||
1. Clip the AtomS3 onto the Atomic CAN Base (ensure proper alignment)
|
||
2. Identify CAN H and CAN L wires from your inverter or CAN device
|
||
3. Connect **CAN H** to **H** (CAN H terminal)
|
||
4. Connect **CAN L** to **L** (CAN L terminal)
|
||
5. Connect **GND** to **GND** for common reference (optional)
|
||
|
||
**CAN Bus Best Practices:**
|
||
- The Atomic CAN Base features **built-in isolation** for protection
|
||
- CAN bus operates at up to **1 Mbps** data rate
|
||
- Supports up to **110 nodes** on the bus
|
||
- Use twisted pair cable (120Ω impedance recommended)
|
||
- **Termination:** Add 120Ω resistors at both ends of the CAN bus
|
||
- If the AtomS3 is at an endpoint, connect a termination resistor
|
||
- Check if your inverter has built-in termination before adding external resistors
|
||
|
||
### Connecting RS485 (RS485-ISO Unit)
|
||
|
||
If using the RS485-ISO Unit for RS485 devices:
|
||
|
||
| RS485 | Terminal Block (VH3.96-4P) |
|
||
|-------|-----------------------------|
|
||
| A + | A (Data+ non-inverting) |
|
||
| B - | B (Data- inverting) |
|
||
| GND | GND (Ground reference) |
|
||
|
||
**Wiring Steps:**
|
||
1. Connect the RS485-ISO Unit to the AtomS3 via the **HY2.0-4P Grove cable** (Yellow=RX, White=TX)
|
||
2. Identify A and B wires from your RS485 device (often labeled D+/D- or A/B)
|
||
3. Connect **RS485 A (D+)** to **Pin 1** (A terminal)
|
||
4. Connect **RS485 B (D-)** to **Pin 2** (B terminal)
|
||
5. Connect **GND** to **Pin 3** for common reference (recommended)
|
||
|
||
**RS485 Best Practices:**
|
||
- The RS485-ISO Unit features **1000V isolation** for protection
|
||
- RS485 operates at up to **500 kbps** data rate
|
||
- Supports up to **256 nodes** on the bus
|
||
- Use twisted pair cable for noise immunity
|
||
- **Termination:** Connect the included **120Ω resistor** between A and B if the unit is at an endpoint
|
||
- The unit includes **fail-safe protection** (outputs high if input is open or shorted)
|
||
|
||
## Power Supply
|
||
|
||
### AtomS3 Power Options
|
||
|
||
**USB Type-C Power:**
|
||
- Connect a USB Type-C cable for **5V power**
|
||
- Recommended for programming, debugging, and testing
|
||
- Built-in **SY8089 DC-DC converter** steps down 5V to 3.3V for ESP32-S3
|
||
- Typical power consumption: 150-300mA (idle to active WiFi)
|
||
|
||
**External 5V via HY2.0-4P Grove port:**
|
||
- Useful when powering the entire assembly from an external 5V supply
|
||
|
||
## Programming & Development
|
||
|
||
### Entering Download Mode
|
||
|
||
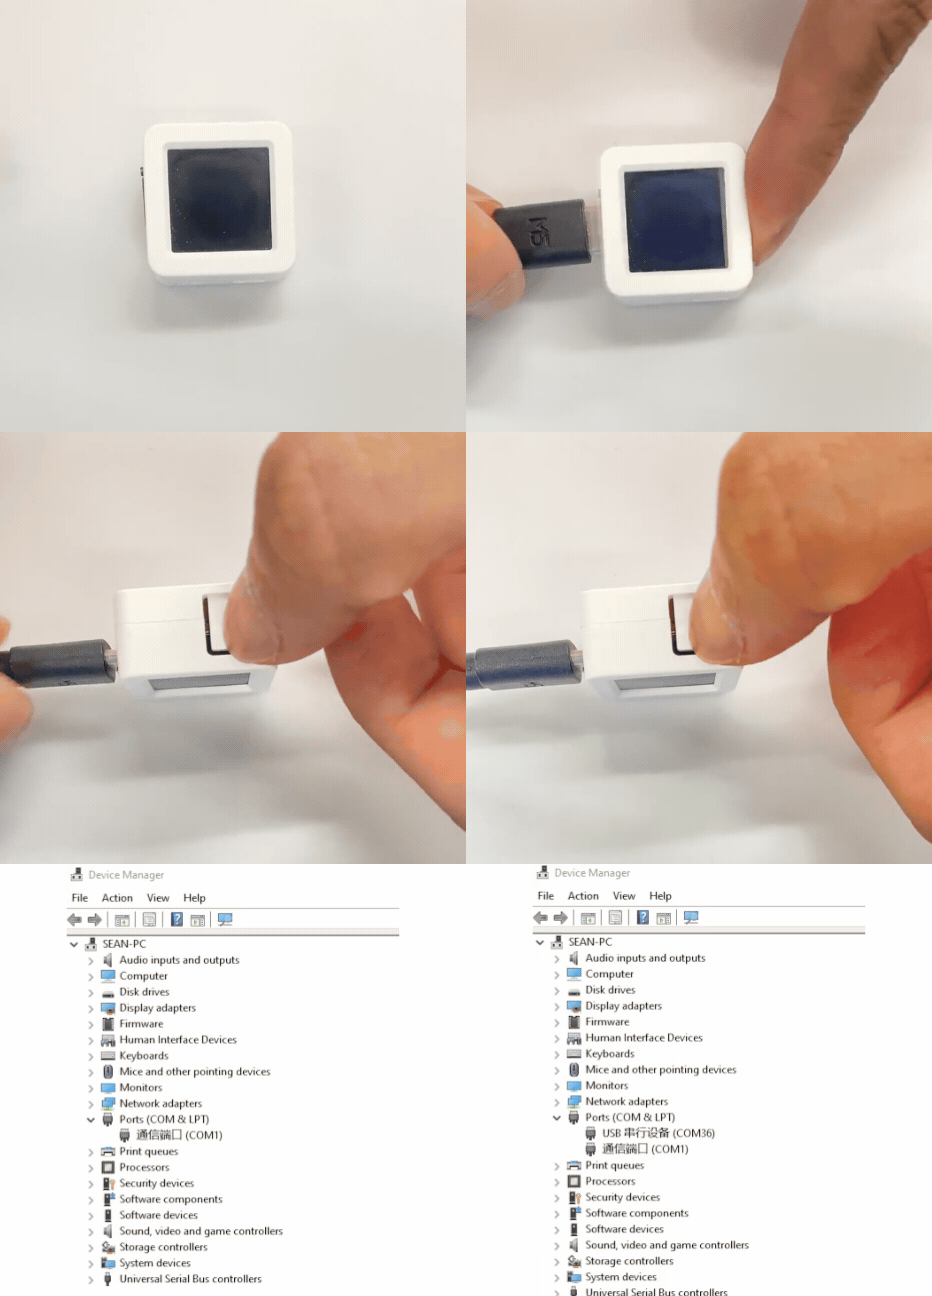
If you have trouble uploading firmware to the AtomS3:
|
||
|
||
**Manual Download Mode:**
|
||
1. **Press and hold the RESET button** (about 2 seconds)
|
||
2. Wait until the **internal green LED lights up**
|
||
3. **Release the button**
|
||
4. The device is now in download mode and ready for flashing
|
||
|
||
|
||
|
||
### LCD Backlight Control
|
||
|
||
**Important:** The PWM signal frequency for the LCD backlight driver should be **500Hz**. A frequency that is too high may cause abnormal brightness adjustment functionality.
|
||
|
||
**Backlight GPIO:** G16
|
||
|
||
## Display Features
|
||
|
||
### Screen Specifications
|
||
|
||
| Specification | Details |
|
||
|---------------|---------|
|
||
| **Size** | 0.85 inch IPS LCD |
|
||
| **Resolution** | 128 × 128 pixels |
|
||
| **Color Depth** | 65K colors |
|
||
| **Driver IC** | GC9107 |
|
||
| **Interface** | SPI |
|
||
| **Backlight** | PWM controlled (GPIO16) |
|
||
|
||
### Display Control Parameters
|
||
|
||
The AtomS3's display can be controlled with the following parameters (useful for YamBMS display management):
|
||
|
||
**Backlight Settings:**
|
||
- **Backlight control**: Manual brightness control (0-100%)
|
||
- **Backlight max level**: Limit the maximum brightness in general
|
||
- **Backlight auto-dim level**: Desired brightness when dimmed down (set to 0 to switch off screen completely)
|
||
- **Backlight auto-dim time**: Time in minutes after which the screen will dim down (set to 0 to disable auto-dimming)
|
||
|
||
**Behavior Notes:**
|
||
- Device restores last screen brightness after boot
|
||
- Auto-dim timer does not start automatically - it gets initially started by pressing the screen button
|
||
- Button press bumps brightness to 100% until the timer dims down again
|
||
- This provides a lightweight solution without complex automation
|
||
|
||
## IMU (MPU6886)
|
||
|
||
The AtomS3 includes a built-in **MPU6886** 6-axis IMU:
|
||
|
||
| Sensor | Details |
|
||
|--------|---------|
|
||
| **Model** | MPU6886 |
|
||
| **Interface** | I2C (address 0x68) |
|
||
| **Pins** | SDA: GPIO38, SCL: GPIO39 |
|
||
| **Features** | 3-axis gyroscope + 3-axis accelerometer |
|
||
|
||
**Use Cases for YamBMS:**
|
||
- Orientation detection
|
||
- Vibration monitoring
|
||
- Installation angle verification
|
||
- Advanced motion-based alerts (optional)
|
||
|
||
**Note:** The I2C pins on the back of the AtomS3 share the same bus with the MPU6886.
|
||
|
||
## Typical YamBMS Configuration
|
||
|
||
### Configuration 1: AtomS3 + Atomic CAN Base + RS485-ISO Unit (Full Setup)
|
||
|
||
**Best for:** Multiple RS485 BMS + inverter via CAN
|
||
|
||
**Components:**
|
||
- AtomS3R (recommended)
|
||
- Atomic CAN Base (A103)
|
||
- RS485-ISO Unit (U094)
|
||
|
||
**Connections:**
|
||
1. Clip AtomS3R onto Atomic CAN Base
|
||
2. Connect inverter to CAN terminal (CAN H/L)
|
||
3. Connect RS485-ISO Unit to AtomS3 via Grove cable (HY2.0-4P)
|
||
4. Connect BMS RS485 bus to RS485 terminals (A/B)
|
||
5. Power via USB Type-C
|
||
6. Add termination resistors at bus endpoints
|
||
|
||
**GPIO Usage:**
|
||
- CAN: Uses UART pins via Atomic CAN Base
|
||
- RS485: Uses G1/G2 via HY2.0-4P Grove port
|
||
- Display: Internal SPI (pre-configured)
|
||
|
||
### Configuration 2: BLE + CAN (Compact Wireless BMS)
|
||
|
||
**Best for:** 2-3 BLE devices + inverter via CAN
|
||
|
||
**Components:**
|
||
- AtomS3R (8MB PSRAM required for stable BLE)
|
||
- Atomic CAN Base (A103)
|
||
|
||
**Connections:**
|
||
1. Clip AtomS3R onto Atomic CAN Base
|
||
2. Connect inverter to CAN terminal
|
||
3. Configure BMS via Bluetooth (up to 3× BMS maximum)
|
||
4. Power via USB Type-C
|
||
|
||
**Limitations:**
|
||
- BLE stack consumes significant RAM
|
||
- May cause crashes/reboots with >2 BMS
|
||
- No physical RS485 connection
|
||
|
||
## Troubleshooting
|
||
|
||
### AtomS3 Not Entering Download Mode
|
||
- **Solution:** Press and hold RESET button (~2 seconds) until green LED lights up, then release
|
||
- Try different USB cable (must support data transfer)
|
||
- Check USB drivers are installed
|
||
|
||
### CAN Bus Communication Issues
|
||
- Verify CAN H and CAN L are correctly connected (not swapped)
|
||
- Check that CAN bus has **exactly two 120Ω termination resistors** (one at each end)
|
||
- Verify CAN bus speed matches inverter (typically 500kbps)
|
||
- Measure resistance between CAN H and CAN L (should be ~60Ω with proper termination)
|
||
- Check isolation: the Atomic CAN Base has built-in isolation, but verify connections
|
||
|
||
### RS485 Communication Issues
|
||
- Verify A and B wiring (try swapping if communication fails)
|
||
- Check baud rate matches all RS485 devices
|
||
- Ensure ground (GND) is connected for common reference
|
||
- Add 120Ω termination resistor at RS485-ISO Unit if at bus endpoint
|
||
- The RS485-ISO Unit has **fail-safe protection** - if input is open/shorted, receiver outputs high
|
||
|
||
### BLE Connection Issues (Bluetooth BMS)
|
||
- AtomS3R (8MB PSRAM) strongly recommended for BLE
|
||
- BLE stack consumes significant RAM - limit to 3 BMS maximum
|
||
- May cause crashes/reboots if too many BLE connections
|
||
- Consider switching to RS485 for multiple BMS units
|
||
|
||
### Display Issues
|
||
- **Backlight frequency:** Ensure PWM frequency is **500Hz** (not higher)
|
||
- **Brightness control:** Use manual control via button or software
|
||
- **Auto-dim not working:** Timer requires manual activation by pressing button after boot
|
||
|
||
### GPIO Limitation Issues
|
||
- **Problem:** Not enough GPIOs for all sensors/devices
|
||
- **Solution:** Use I2C-based sensors (shares I2C bus with IMU)
|
||
- **Alternative:** Consider boards with more GPIOs (LilyGo T-Connect, Waveshare ESP32-S3-RS485-CAN)
|
||
|
||
## Additional Resources
|
||
|
||
### Official M5Stack Documentation
|
||
- [AtomS3 Official Docs](https://docs.m5stack.com/en/core/AtomS3)
|
||
- [AtomS3 Lite Official Docs](https://docs.m5stack.com/en/core/AtomS3%20Lite)
|
||
- [AtomS3R Official Docs](https://docs.m5stack.com/en/core/AtomS3R)
|
||
- [Atomic CAN Base Official Docs](https://docs.m5stack.com/en/atom/Atomic%20CAN%20Base)
|
||
- [RS485-ISO Unit Official Docs](https://docs.m5stack.com/en/unit/iso485)
|
||
|
||
### Schematics & Datasheets
|
||
- [AtomS3 Schematic PDF](https://m5stack-doc.oss-cn-shenzhen.aliyuncs.com/472/Sch_M5_AtomS3_v1.0.pdf)
|
||
- [AtomS3 IMU Schematic PDF](https://m5stack-doc.oss-cn-shenzhen.aliyuncs.com/472/Sch_AtomS3_IMU.pdf)
|
||
- [ESP32-S3 Datasheet](https://m5stack-doc.oss-cn-shenzhen.aliyuncs.com/472/esp32-s3_datasheet_en.pdf)
|
||
- [MPU6886 Datasheet](https://m5stack.oss-cn-shenzhen.aliyuncs.com/resource/docs/datasheet/core/MPU-6886-000193%2Bv1.1_GHIC_en.pdf)
|
||
- [CA-IS3050G Datasheet](https://m5stack.oss-cn-shenzhen.aliyuncs.com/resource/docs/datasheet/unit/CA-IS3050G.pdf) (CAN transceiver)
|
||
- [CA-IS3082W Datasheet](https://m5stack.oss-cn-shenzhen.aliyuncs.com/resource/docs/datasheet/unit/IS3082W.pdf) (RS485 transceiver)
|
||
|
||
### Software Libraries
|
||
- [M5AtomS3 Arduino Library](https://github.com/m5stack/M5AtomS3)
|
||
- [M5Unified Library](https://github.com/m5stack/M5Unified)
|
||
- [AtomS3 Factory Firmware](https://github.com/m5stack/M5AtomS3-UserDemo)
|
||
|
||
### Where to Buy
|
||
- [M5Stack Official Store](https://m5stack.com/)
|
||
- [M5Stack AliExpress](https://m5stack.aliexpress.com/store/911661199)
|
||
- [M5Stack Amazon](https://www.amazon.com/shops/m5stack)
|
||
- [M5Stack Distributors](https://m5stack.com/distributor)
|
||
|
||
## Product Comparison
|
||
|
||
### AtomS3 vs Other YamBMS Boards
|
||
|
||
| Feature | AtomS3 + Atomic CAN | LilyGo T-Connect | Waveshare ESP32-S3-RS485-CAN |
|
||
|---------|---------------------|------------------|------------------------------|
|
||
| **Size** | Very compact (24×24mm) | Medium (94×83mm) | Medium with DIN rail case |
|
||
| **Display** | ✅ 0.85" IPS (128×128) | ❌ No | ❌ No |
|
||
| **RS485 Ports** | 1 (via Unit) | Up to 3 | 1 (isolated) |
|
||
| **CAN Ports** | 1 (isolated) | 1 | 1 (isolated) |
|
||
| **Isolation** | ✅ Yes (CAN + RS485 Unit) | ✅ Yes (both) | ✅ Yes (both) |
|
||
| **Termination** | External | External | ✅ 120Ω jumper-selectable |
|
||
| **GPIOs** | ⚠️ Very limited | Moderate | Moderate |
|
||
| **PSRAM** | Optional (AtomS3R: 8MB) | 8MB | 8MB |
|
||
| **Best For** | Compact installations, display needed, RS485 BMS | Multiple RS485 ports | Industrial, built-in termination |
|
||
| **Price** | Moderate (modular) | Moderate | Moderate |
|
||
|
||
**When to Choose AtomS3:**
|
||
- ✅ Compact size is critical
|
||
- ✅ Built-in display desired
|
||
- ✅ Modular expansion preferred
|
||
- ✅ BMS via RS485 (multiple units)
|
||
- ❌ Need many GPIOs
|
||
- ❌ Need multiple RS485 ports simultaneously
|
||
|
||
## FAQ
|
||
|
||
**Q: Which AtomS3 variant should I choose?**
|
||
A: For YamBMS, we recommend **AtomS3R (C126)** with 8MB PSRAM if using Bluetooth BLE, as it provides extra RAM to prevent crashes. For RS485-only applications, AtomS3 or AtomS3 Lite is sufficient.
|
||
|
||
**Q: Can I use multiple RS485 and CAN simultaneously?**
|
||
A: Yes, but with limitations. AtomS3 has very few GPIOs. You can use Atomic CAN Base (CAN) + RS485-ISO Unit (RS485) simultaneously, but additional expansion is limited.
|
||
|
||
**Q: How many BMS can I monitor via UART?**
|
||
A: Maximum 3× BMS via UART. The 2nd and 3rd UARTs requires soldering connections on the Atomic CAN Base.
|
||
|
||
**Q: Does the Atomic CAN Base require external termination resistors?**
|
||
A: The Atomic CAN Base does not have built-in switchable termination. You must add external 120Ω resistors at both ends of the CAN bus.
|
||
|
||
**Q: Why does my BLE connection crash after adding the 3rd BMS?**
|
||
A: The BLE stack consumes significant RAM. Use AtomS3R (8MB PSRAM) and limit to 3 BMS maximum.
|
||
|
||
**Q: Can I power the AtomS3 from the CAN bus?**
|
||
A: No, you should power the AtomS3 via USB Type-C (5V). The CAN bus voltage is not suitable for directly powering the device.
|
||
|
||
**Q: How do I control the screen backlight?**
|
||
A: Use PWM on GPIO16 at 500Hz frequency. Brightness can be controlled manually, and auto-dim requires button activation to start the timer.
|
||
|
||
---
|
||
|
||
**License:** This documentation is part of the YamBMS project and follows the same GPLv3 license.
|
||
|
||
**Acknowledgments:** Based on official M5Stack documentation and community contributions.
|